Hello Beauties
I was able to attend the IMATS in Toronto this past October and it was such an amazing time. For those of you who are not familiar with this event, IMATS stands for International Makeup Artist Tradeshow. This event is held in the cities of Los Angeles, New York City, Toronto, Vancouver, London and Sydney. At IMATS you can visit booths of Makeup retailers and attend multiple workshops. I attended a few workshops but the ones that stood out was the Indian Bridal Makeup and The special effects: Bruises workshops. I learned so much and had a great time.
There are some tips I wish I knew before attending.
1. Make sure you have Canadian currency. There was so many booths partaking that did not take cards. And if they did take cards, they did not apply the discount towards your purchase.
2. Make sure you get there super early. The Morphe booth had a 3+ hr wait time. And they encouraged you to use Canadian currency or the discount did not apply. Luckily I found out this info before waiting too long.
3. Pack a lunch. I was starving when I was there and the food that was at the convention centre was over-priced.
4. Do not wear extra clothing. I was so hot and sweaty from the running around. I was also carrying a bag which was annoying. Don't bring a purse. Carry you money and Credit Cards in your pocket.
5. Make sure you map out where you are going to park. It was so busy in downtown Toronto and parking ramps were sparse.
Thursday, December 1, 2016
Tuesday, September 27, 2016
Makeup Brushes 101

Hello Beauties
Professional or beginner. You cannot create your makeup look without the right makeup brush. With all the different brushes out there, it can be confusing on which one to use. Below is a guide for each brush and their uses...enjoy! xoxoxo

Fan Brush
Use: Apply highlighter or sweep away excess shadow from undereye or face.

Foundation Brush/Sponge
Use: Apply Liquid Foundation. Blend cream products
Powder Brush
Use: Apply powder foundation or loose powder. Blend blush or contour to foundation.

Angled Contour Brush
Use: To apply bronzer for contouring

Blush Brush
Use: Apply blush. Set powder on concealer
Eyeshadow Brush
Use: Apply or pat on shadow to the lid
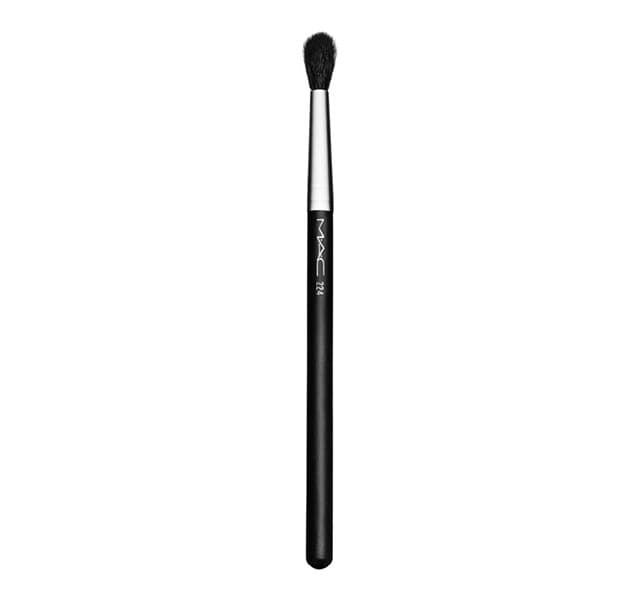
Blending Brush
Use: Blending eyeshadow on the crease or outer V

Smudger
Use: To smudge shadow on the lower lash line

Crease Brush
Use: Apply shadow directly to the crease

Liner/Brow Brush
Use: Applying eye liner or brow pomade

Brow Brush
Use: To brush out your brow hair
Tuesday, September 6, 2016
Fall Makeup
Hey Beauties,
I took a little hiatus but I am back. I hope everyone enjoyed their summer. I don't know about you but I LOVE Fall. Pumpkins, Hoodies and Halloween. Also October is my birthday month. But there is one thing I mostly love about fall. Fall makeup. Dark lips, smoky eyes and lighter foundation. Dark red and plum lips. Cool Tone eyes. Matte finishes. Also cosmetic companies will be launching their new products in the upcoming weeks. Lorac is coming out with a new palette, Anastasia Beverly Hills concealer sticks and so on and so on. Below are some of my fave fall, vampy looks. Enjoy!
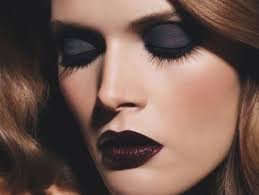
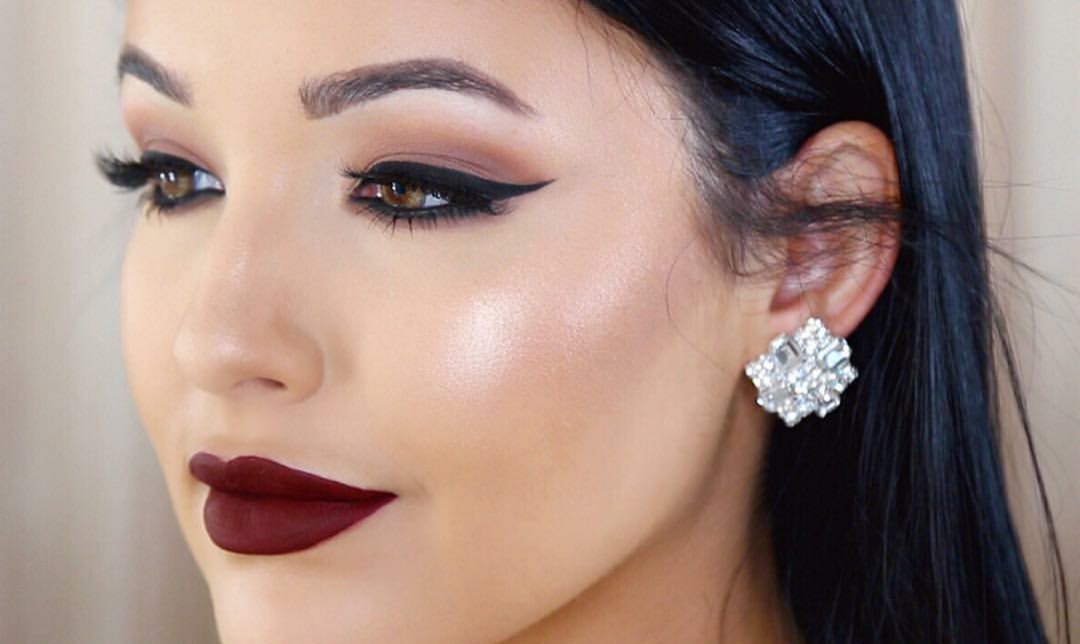
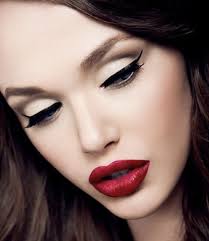


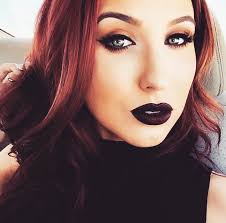


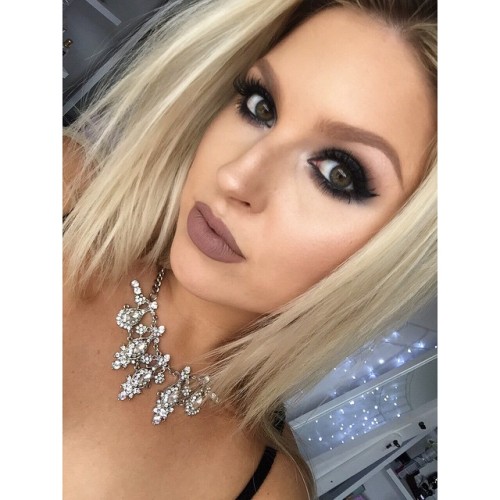
I took a little hiatus but I am back. I hope everyone enjoyed their summer. I don't know about you but I LOVE Fall. Pumpkins, Hoodies and Halloween. Also October is my birthday month. But there is one thing I mostly love about fall. Fall makeup. Dark lips, smoky eyes and lighter foundation. Dark red and plum lips. Cool Tone eyes. Matte finishes. Also cosmetic companies will be launching their new products in the upcoming weeks. Lorac is coming out with a new palette, Anastasia Beverly Hills concealer sticks and so on and so on. Below are some of my fave fall, vampy looks. Enjoy!
Tuesday, April 26, 2016
Summer Beauty Must DO's

Hello Beauties

1. Is the most important. PROPER HYGIENE
I cannot stress this enough. Being hot and musty is not cute. So take extra showers and Remember...deodorant and baby powder is your friend.

2. Pedicures and Landscape
It is always good to get a pedi every 2 weeks. Now that flip flop weather is amongst us, your feet are exposed to the environment. Every step you take you are kicking up dirt and dust. Keep the toenails short because they can be susceptible to fungus. As for Landscape, keep those legs shaved and bikini areas neat and tidy. No one wants to see an enchanted forest when you're at the beach.

3. Change your Makeup
Don't forget you will tan this summer, so the darker you are the darker your foundation should be. You should also take this time to throw away old makeup and tools. Lots of bacteria can be harboring inside and can lead to breakouts. Hot, muggy living areas can lead to dampness which can lead to mildew.

4. Take care of your skin.
Make sure you use a high SPF Sunscreen when you are out and about. You can easily burn after a short walk. Wear a hat and moisturize. Sunburns can lead to wrinkles, dry skin and skin cancer. Try to stay clear of Sunless and spray tans because they can include harmful chemicals that can age your skin.

5. Eat Healthy
I know it's hard. You don't want to turn your oven on during 90 degree weather so it's a lot easier to just order out. But it doesn't have to be hard. You can eat a lot of veggie and fruit salads. Also utilize your BBQ grill. Grill up some chicken or mixed veggies. Don't forget to drink lots of water.
A lot of these are just common sense. But you'd be surprise how easily you forget when you're having fun! Stay beautiful!
Thursday, April 7, 2016
Blemishes and Redness. How to cover them like a pro
How many times have we woken up to find a giant pimple on our face or redness either from the weather or lack of sleep? This can damper your whole day. I have a couple of tricks that I use when I break out or have discoloration.
1. Make sure you pop the pimple. No point of trying to cover up a mountain. The smoother the surface the better. Only pop it when it's ready (white head).
2. Apply a skim smoother. I use L'Oreal Miracle Blur. Anything collagen based would work. Another great product is Nivea After shave balm. Trust me, it works :)
3. Apply a full coverage foundation. Make sure you apply a little more then normal on the red part or where the blemish is.
4. Apply concealer on the affected areas. I use Maybelline Face Studio Master conceal in a lighter shade and spot conceal.
5. Apply a tinted face powder to the affected areas. Don't forget to blend!!!
How to match the right eyeshadow for your color eye

Hello Beauties
There are so many different color eyeshadows in the makeup industry. I remember once going to Ulta looking for a smoky grey eyeshadow and had about 12 different options. It can be overwhelming buying the wrong shadow for your eye color. Applying the wrong color will make you look unflattering and amateur. I have brown eyes and I tend to stay with the warm tones like brown, taupe and beiges. Below are some of my ideas for what color matches best for your eye type. But also remember makeup is supposed to be fun and daring so if you want to be edgy and wear different colors, Rock it out! Peace, Love and Makeup!
Blue Eyes
Brown Eyes
Hazel Eyes
Maroon or purple are great colors for Hazel eyes. Lavenders and lilacs work too just make sure it's not too white. To bring out the brown in the eyes apply earth tones like chocolate or terra cotta.Green Eyes
Friday, March 25, 2016
Home Remedies for Dry, Chapped Lips

Hello Beauties
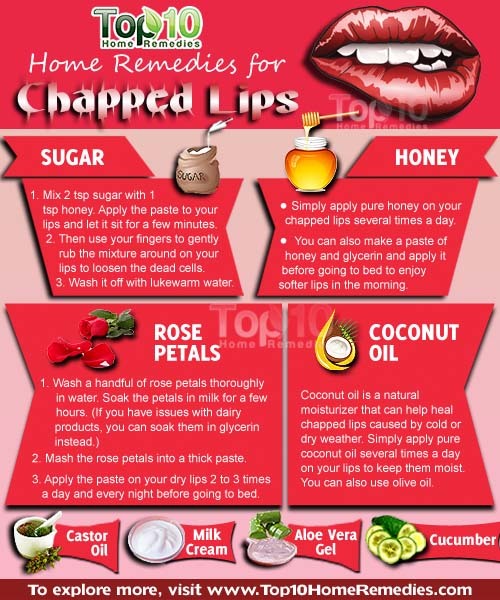
Chapped or dry lips are a common problem that can be painful and unattractive. Common symptoms are dryness, redness, cracking, flaking, and tender or sore lips. Some of the main causes are vitamin deficiency, allergic reaction, dehydration, smoking, excessive licking of lips, sun exposure and harsh weather. There are many commercial products available to treat chapped lips. But you can save money and easily get relief with some easy-to-follow natural remedies. Below is a picture of a few items you can find in your home that will get you having soft, pouty lips in no time. Stay Beautiful
Monday, March 21, 2016
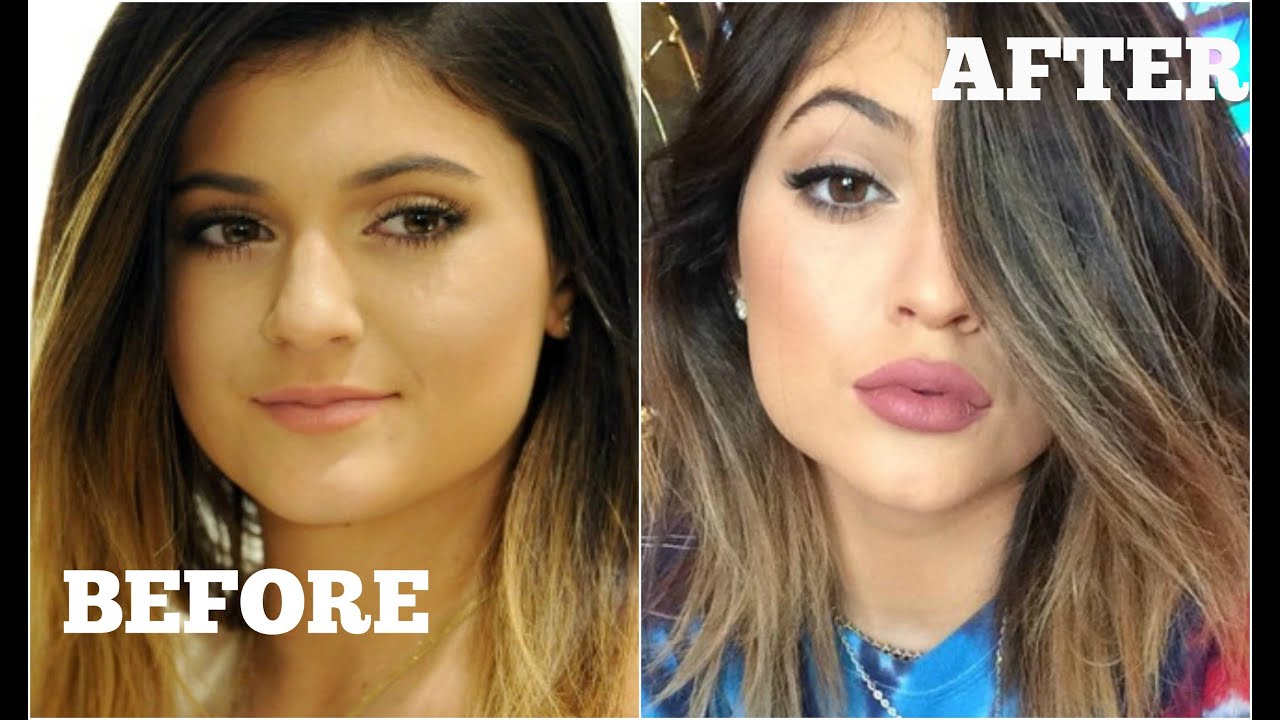
Overlining lips like Kylie Jenner.
Hello My Lovies
I know it's been a while since I have posted. In today's makeup world, I keep seeing everyone trying to get the Kylie Jenner look. For those of you who don't know what I am talking about, I am talking about her overlined, voluptuous lips. Not everyone is blessed with a sexy pout. Some of us are born with thin lips and when you apply lipstick on it, they just look thinner. Below are some tips on how to achieve beautiful, full lips.
Here’s what you’ll need:
- Concealer that matches your skin
- Powder
- A lip liner in a shade close to your natural lip color
- A matte or satin lipstick in a shade close to the liner
- A light, non-sticky lip gloss
- Powder
- A lip liner in a shade close to your natural lip color
- A matte or satin lipstick in a shade close to the liner
- A light, non-sticky lip gloss
Begin by blending the concealer around the outline of your lips. Don’t take it in too far; you just want to hide your mouth’s natural perimeter a little.
Next, apply some powder overtop to set the concealer. You can brush this all over your lips if you like.
With your sharpened lip liner, begin tracing slightly outside the natural outline of your lips. The further outside the periphery you draw this line, the bigger and stranger your lips will look; keep it small for a subtle look.
Using small, feathery strokes from the outside in, fill in both lips with the liner. This will stop any strange color delineations between skin and lips. It also provides a good base for your lip color to stick to.
Apply your lipstick on top. Kylie seems to prefer matte lipsticks, but I find that colors with a bit of shine work better in real life.
Finally, to create even more depth and dimension, Dab a tiny bit of semi-clear lip gloss in the center of your upper and lower lips.
Remember to keep it natural. No one likes lips that look like you have an allergic reaction to peanuts lol. Stay Beautiful
Friday, March 4, 2016
10 BEAUTY HACKS THAT WILL WOW YOU!!!
Hi Beauties
There are so many makeup tricks you can do to keep you beautiful.
Below are a few of them.
1. How to make your eyes look bigger
Sweep your mascara towards your nose instead of upwards. This will help make the lashes look fuller. It will also help to make your eyes look bigger.

2. How to get the leftover makeup in tubes.
Cut them open, and scoop the makeup into plastic pots. This is a great way to save money on makeup.

3. Applying Eye Lash Glue
Applying eyelash glue can be so tricky. Make it easier by putting the glue on a bobby pin. Apply the glue with the tip of the bobby pin for a more even and quicker application.

4. Make your own Lip Gloss
Don’t throw away your broken eye shadows. Instead, turn them into lip gloss. Crush the eye shadow into powder, then mix with petroleum jelly to make any color lip gloss you like.

5. No More lipstick on your teeth
After applying your lipstick, put your finger in your mouth. Close your lips around your finger, then pull your finger out. The excess lipstick will get on your finger, and not on your teeth.

6. Restoring Dry Mascara
Don’t throw away mascara just because it has dried up. Instead, add a few drops of saline solution. This will make it moist and it will work as well as it did when you first bought it.

7. Get rid of that shine
Toilet seat covers are ideal for blotting makeup. They are made from similar materials as blotting papers. So, if you are out of blotting papers, reach for a toilet seat cover to blot away excess skin oils.

8. Fixing a broken Lipstick
Use a lighter to melt the bottom of the broken piece. Re-attach to the stick, hold in place and put in fridge for 1 hr

9. How to make lipstick last longer
Keep those lips kissable by sealing the deal. After your lipstick is applied, hold a tissue over your lips and apply powder over the tissue. This creates a matte look that lasts much longer.

10. Depotting makeup
Depotting is the practice of removing a makeup product, such as eyeshadow, blush or lipstick, from it's original container and placing it into more practical packaging. remove any stickers or labels because these can catch fire. Make sure the flame is touching the bottom of the item you are depotting, the plastic will begin to melt but shouldn't drip. Keep an eye on it to make sure it doesn't catch fire, this has happened to me a few times but I just blow out the flame. It only takes about 20-30 seconds so make sure you don't hold it over the flame for too long. After the bottom has begun to melt take your item with pliers, and put it over a plate or paper towel. The product should come out smoothly, if it doesn't you may need to put it back over the flame for a bit longer. Place into a Z Palette

Thursday, March 3, 2016
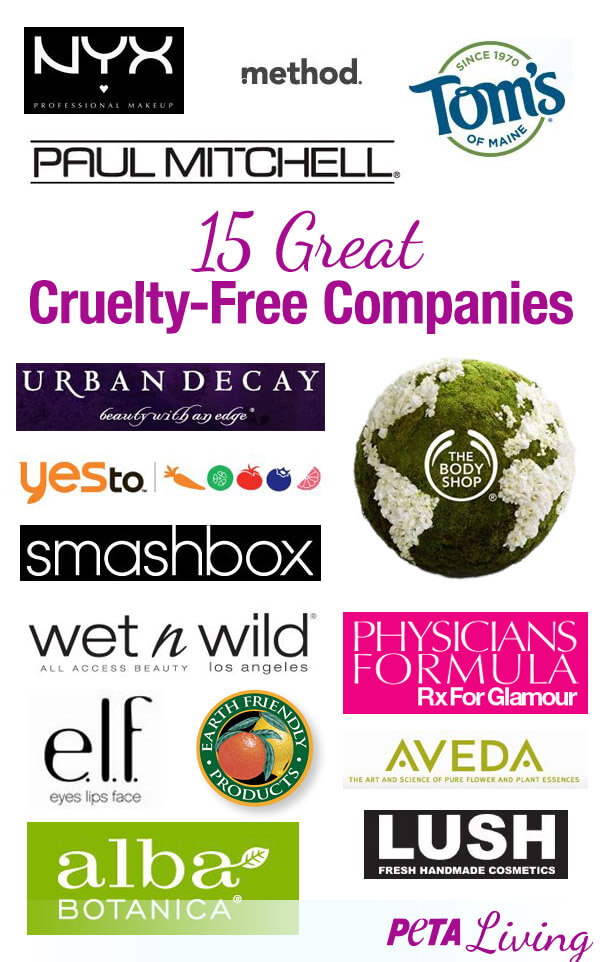
Animal Tested and Cruetly Free Makeup Products
As an animal lover, I find it horrifying to read stories on Animal Cruelty. Did you know, many of our everyday Household items are tested on animals or include animal tested ingredients. The thought of these poor defenseless animals being treated in such a way breaks my heart. Some debates on animal testing are "If we do not test on animals to find cures for diseases then we will have to test on humans, Fact is, there is already human testing. Because animal tests are so unreliable, they make those human trials all the more risky.
Below are some examples of companies that test on animals and companies that are cruelty free.


Subscribe to:
Comments (Atom)